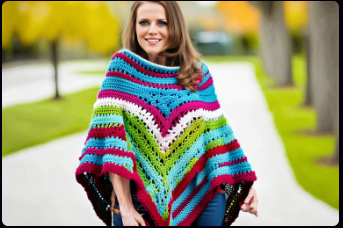
Ponchos are timeless and versatile pieces of clothing that have been worn by various cultures throughout history. Crochet a poncho for beginners. A poncho is essentially a single large piece of fabric with a hole in the center for your head. It’s typically worn as an outer layer and drapes over the body, offering warmth and style.
The beauty of a poncho lies in its adaptability; it can be both a practical garment for keeping warm and a fashionable accessory. Ponchos can be made in a wide range of styles, colors, and patterns, making them suitable for various occasions, from casual outings to formal events.
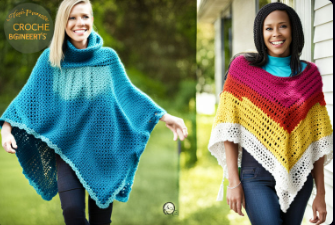
With their simple yet elegant design, ponchos are perfect for beginners to crochet. They provide a fantastic canvas for learning basic crochet stitches and techniques while creating a functional and fashionable item. This article aims to guide beginners through the process of crocheting a poncho, from choosing the right materials to finishing touches.
Jump to a Specific Section
Purpose of the Article: Teaching Beginners How to Crochet a Poncho
The primary objective of this article is to empower individuals who are new to crocheting by providing a step-by-step guide on creating their very own poncho. Crochet is a wonderful craft that allows for endless creativity, and crocheting a poncho is a rewarding project for those looking to expand their skills.
By following the instructions and tips in this article, beginners will gain the confidence and knowledge needed to complete their first crochet poncho. We’ll cover the essential techniques and methods in a beginner-friendly manner, ensuring that even those with minimal crochet experience can successfully create a beautiful poncho.
Materials Needed for the Project
Before diving into the crocheting process, it’s important to gather all the necessary materials. Here’s a list of what you’ll need to get started:
- Yarn Selection and Quantity: The choice of yarn is crucial as it impacts the warmth, texture, and overall look of your poncho. Opt for a soft, medium-weight yarn that is easy to work with. The quantity of yarn will depend on the size of your poncho and the chosen pattern.
- Crochet Hook Size: The size of your crochet hook determines the size and texture of your stitches. For beginners, it’s advisable to start with a G (4.0 mm) or H (5.0 mm) hook, as these sizes are versatile and commonly used in many crochet patterns.
- Other Essential Tools and Accessories: In addition to yarn and a crochet hook, you’ll need a few more items to complete your project. These include:
- Scissors: For cutting the yarn as needed.
- Yarn Needle: Essential for weaving in loose ends and finishing your project neatly.
- Measuring Tape: To ensure your poncho is the desired size.
- Stitch Markers: Helpful for marking specific stitches or rows, which can be especially useful in more complex patterns.
Once you have all the materials in hand, you’ll be well-prepared to start your crochet poncho project. Remember that investing in high-quality yarn and tools can make the process more enjoyable and the final result more impressive.
By understanding what a poncho is, the purpose of this article, and the materials required, beginners will be ready to embark on their crochet journey and create a unique and stylish poncho that reflects their personal taste and creativity. In the subsequent sections of this article, we will delve deeper into the step-by-step process of crocheting a poncho for beginners, providing the guidance needed to successfully complete this enjoyable and rewarding project.
Materials Needed
Selecting the right yarn is a critical decision when crocheting a poncho, as it greatly influences the final look and feel of your creation. For beginners, it’s best to opt for a soft, medium-weight yarn in a color and texture that you love. Here are a few key considerations when choosing your yarn:
Yarn Weight: Yarn comes in various weights, ranging from laceweight (very thin) to super bulky (very thick). For a beginner-friendly poncho, look for a yarn labeled as “worsted weight” or “medium weight” (usually symbolized by a number 4 on the yarn label). This weight is easy to work with and is versatile for a wide range of projects.
Fiber Content: Yarn can be made from a variety of materials, including acrylic, cotton, wool, and blends. Acrylic yarn is a popular choice for beginners due to its affordability, durability, and wide color selection. Wool provides warmth and natural insulation, but it may require more care when washing.
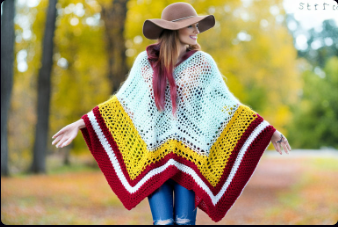
Color and Texture: Choose a color that speaks to your personal style and complements your wardrobe. Whether you prefer bold and vibrant hues or subtle neutrals, the color is an essential part of your creative expression. Additionally, consider the texture of the yarn. Smooth yarn is easier to work with for beginners, as it allows your stitches to glide smoothly.
The quantity of yarn needed will depend on the size of the poncho you wish to create. Most patterns provide an estimate of the yardage required, typically measured in grams or ounces. It’s a good practice to buy a little more yarn than the pattern suggests to account for any mistakes or deviations from the pattern.
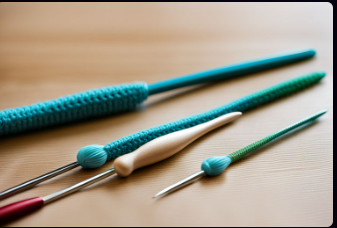
Crochet Hook Size
The size of your crochet hook plays a crucial role in determining the size and texture of your stitches. For beginners, it’s recommended to start with a G (4.0 mm) or H (5.0 mm) hook. These hook sizes are commonly used for medium-weight yarn and are readily available.
Understanding the relationship between your hook size and yarn weight is essential. A larger hook creates larger stitches, while a smaller hook creates smaller, tighter stitches. By matching the hook size to the yarn weight, you’ll achieve a balanced and aesthetically pleasing result.
Keep in mind that if you use a different hook size than recommended in the pattern, it can alter the size and drape of your poncho. Therefore, if you decide to experiment with different hook sizes, make a gauge swatch (a small test piece) to ensure your project will turn out as intended.
Other Essential Tools and Accessories
In addition to yarn and a crochet hook, you’ll need a few more tools and accessories to facilitate the crocheting process and finish your poncho professionally:
Scissors: Quality scissors are essential for cutting yarn cleanly and neatly. They come in handy when changing colors, fastening off, or trimming loose ends.
Yarn Needle: A yarn needle, also known as a tapestry needle, is used to weave in loose ends. After completing your project, you’ll have a few tails of yarn that need to be neatly concealed within the fabric for a polished look.
Measuring Tape: To ensure your poncho reaches the desired size, a measuring tape is invaluable. It helps you check your progress and make sure your poncho is turning out as intended.
Stitch Markers: Stitch markers are small, removable tools used to mark specific stitches or rows. They are especially useful in more complex patterns to help you keep track of where you are and maintain even stitch counts.
As you gather these essential tools and materials, you’ll be well-prepared to embark on your crochet poncho project. A well-thought-out selection of yarn, hook size, and accessories is key to a successful and enjoyable crocheting experience. These materials are your artistic palette, and by choosing them wisely, you’ll be on your way to creating a stunning poncho that reflects your unique style and personality.
Choosing the Right Pattern
The choice of a suitable crochet pattern is a pivotal step in your journey to create a beautiful poncho. For beginners, it’s essential to start with simple and straightforward patterns that don’t involve intricate stitches or complex techniques. Here’s how to go about finding the perfect pattern:
1. Online Resources: The internet is a treasure trove of crochet patterns, and there are numerous websites and platforms dedicated to sharing patterns for all skill levels. Websites like Ravelry, Pinterest, and crafting blogs often offer a vast selection of free and paid poncho patterns.
2. Crochet Books: Many crochet pattern books cater to beginners, offering step-by-step instructions and clear illustrations. These books often provide patterns for various types of ponchos, ensuring you find one that suits your style.
3. Local Yarn Stores: Your local yarn store is an excellent place to find printed patterns that you can physically browse. The staff at these stores can also offer advice on selecting a pattern and the yarn to go with it.
When selecting a pattern, consider the following factors:
Difficulty Level: Look for patterns labeled as “beginner” or “easy” to ensure that the project matches your skill level.
Size: Ensure the pattern provides guidance on sizing, so you can create a poncho that fits you perfectly.
Yarn Recommendations: The pattern should recommend the type and amount of yarn required. Double-check that the suggested yarn aligns with your preferences and budget.
Explain How to Read and Understand Crochet Patterns
Reading a crochet pattern might seem daunting at first, but it’s an essential skill for any crocheter. Crochet patterns are essentially sets of instructions that guide you through the process of creating a specific item, in this case, a poncho. Here’s a breakdown of how to understand and read these patterns:
1. Abbreviations: Crochet patterns often use abbreviations to save space and make instructions concise. Common abbreviations include “ch” for chain, “sc” for single crochet, “dc” for double crochet, and so on. Patterns usually provide a list of abbreviations at the beginning to help you decode the instructions.
2. Symbols and Charts: Some patterns, especially those for more intricate designs, include charts or diagrams with symbols representing different stitches. Learning to read these charts can be a valuable skill, but it’s not always necessary for beginner-level poncho patterns.
3. Row-by-Row Instructions: The main part of a crochet pattern consists of row-by-row instructions. These instructions detail the type of stitch to use, the number of stitches, and any special actions like increasing or decreasing. It’s crucial to follow these instructions in order.
4. Repeats: Many crochet patterns include repeated sections, often enclosed in brackets or asterisks. When you encounter these, it means you should repeat the instructions within the brackets or asterisks as many times as indicated.
5. Sizing: The pattern will typically provide information on sizing, helping you choose the right size and tailor the poncho to your body. Be sure to reference this section when crocheting.
6. Gauge: Gauge refers to the number of stitches and rows per inch, and it’s vital for ensuring your poncho matches the pattern’s dimensions. The pattern usually specifies the gauge, and it’s important to make a gauge swatch before beginning your project.
As you become more experienced, reading crochet patterns will become second nature. When you’re first starting out, don’t be discouraged by the seemingly complex instructions. Take it one step at a time, and with practice, you’ll build your confidence and skill.
In summary, selecting the right pattern is crucial for beginners, and understanding how to read and interpret crochet patterns is a foundational skill. As you explore simple poncho patterns and gain confidence in deciphering pattern instructions, you’ll be well on your way to creating a beautiful and customized crochet poncho that you can proudly wear and showcase your crochet talents.
Getting Started
Before you can dive into crocheting your poncho, you’ll need to begin with a slipknot. The slipknot is the first step in setting up your crochet project, and it’s a fundamental skill every crocheter needs to master. Here’s how to create a slipknot:
1. Prepare Your Yarn: Start by unrolling a length of yarn from the skein (a large, loosely wound bundle of yarn). Leave a tail end of about 6 inches (15 cm) for weaving in later.
2. Form a Loop: Hold the yarn in your dominant hand and create a loop by crossing the yarn over itself. The end of the yarn that’s still attached to the skein should be behind the loop.
3. Tuck the End Through: Take the end of the yarn that’s attached to the skein and tuck it through the loop from front to back, creating another loop. This second loop is the slipknot.
4. Adjust and Tighten: Hold onto the initial loop with your non-dominant hand and gently pull the tail end to tighten the slipknot. It should snugly fit around your crochet hook, but not too tightly.
Chaining the Foundation Row
The foundation row, often called the starting chain, is the basis for your crochet project, including your poncho. It determines the width of your poncho and acts as the foundation for the first row of stitches. Here’s how to create the foundation row:
1. Hold the Slipknot: Begin by holding the slipknot you just created in your non-dominant hand. The tail end of the slipknot should be on the side facing you, while the yarn leading to the skein should be behind.
2. Yarn Over: Position your crochet hook under the yarn leading to the skein, from right to left (if you’re right-handed). This creates a yarn-over.
3. Pull Through: With your crochet hook, pull the yarn-over through the slipknot, creating a new loop on your hook. This loop is your first chain stitch.
4. Repeat: Continue to yarn over and pull through the loop (step 3) to create additional chain stitches. The number of chain stitches you make depends on your pattern and desired poncho width.
Remember to keep your tension consistent while making the chain stitches. Not too tight or too loose; aim for a comfortable tension that allows the stitches to move freely along the hook.
Joining the Foundation Row into a Circle
Many crochet poncho patterns are worked in the round, which means you’ll be joining the ends of the foundation chain to form a circle. This circular design is especially common for ponchos as it provides a seamless and flowing look. Here’s how to join the foundation row into a circle:
1. Count Your Chains: Make sure you have the correct number of chain stitches as specified in your pattern. Ensure there are no twists in the foundation chain.
2. Slip Stitch: Insert your crochet hook into the first chain you made. Be careful not to twist the chain.
3. Yarn Over and Pull Through: Yarn over (wrap the yarn around the hook) and pull through both the chain and the loop on your hook. This creates a slip stitch, which connects the first and last chain stitches, forming a circle.
4. Chain 1: Most patterns will instruct you to chain 1 after making the slip stitch to create a turning chain. This turning chain helps to maintain the correct height for your stitches.
With your foundation row joined into a circle, you’re now ready to begin crocheting the first round of your poncho. Keep in mind that as you work in the round, each row will start at the same point, creating a continuous circular pattern. This approach lends itself well to creating the body of a poncho that drapes beautifully around your shoulders and offers a timeless, elegant look.
Crocheting the Poncho
With your foundation row ready, you’re now set to dive into the heart of your crochet poncho project by mastering the basic crochet stitches. Two of the most commonly used stitches in crochet are the single crochet (sc) and double crochet (dc). Here’s how to execute these fundamental stitches:
1. Single Crochet (sc):
- Insert your crochet hook into the stitch or space where you want to make a single crochet.
- Yarn over (wrap the yarn around your hook from back to front).
- Pull up a loop, so you have two loops on your hook.
- Yarn over again and pull through both loops on your hook.
- You’ve just completed a single crochet stitch.
2. Double Crochet (dc):
- Yarn over (wrap the yarn around your hook from back to front).
- Insert your hook into the stitch or space.
- Yarn over again and pull up a loop. You should have three loops on your hook.
- Yarn over once more and pull through the first two loops on your hook.
- Yarn over and pull through the remaining two loops.
- You’ve created a double crochet stitch.
Your choice of stitch will depend on the pattern you’ve selected for your poncho. Single crochet stitches are tighter and create a denser fabric, making them ideal for warmth and structure. Double crochet stitches, on the other hand, are taller and create an airier fabric, perfect for a lighter, draping poncho.
How to Increase and Decrease Stitches
Understanding how to increase and decrease stitches is essential for shaping your poncho. Increases add stitches to widen your work, while decreases remove stitches to make it narrower. Here’s how to execute these techniques:
1. Increasing Stitches:
- To increase in crochet, simply work two or more stitches into the same stitch or space. For instance, if you’re working with a single crochet, you can make two single crochets in the same stitch to increase.
- Increases are often needed to create the flared or A-line shape common in many poncho designs.
2. Decreasing Stitches:
- To decrease, you’ll skip one or more stitches or use specific decreasing techniques. The most common decrease is the single crochet two together (sc2tog) or double crochet two together (dc2tog), which involve joining two stitches into one.
- Decreases are essential for tapering the poncho at the neck or shoulders and creating the desired shape.
Shaping the Poncho
Shaping your crochet poncho is where the magic happens. The shaping depends on the pattern you’ve chosen, and it could include elements like neck openings, armholes, or even decorative patterns. To shape your poncho, follow these general guidelines:
1. Follow the Pattern: Carefully read and follow the pattern instructions. The pattern will specify when and where to increase or decrease stitches to achieve the desired shape.
2. Use Stitch Markers: Consider using stitch markers to mark key points in your pattern, like the center of the neck or the beginning of a round. This helps you maintain symmetry and follow the pattern accurately.
3. Check Sizing: Regularly measure your work against the pattern’s dimensions to ensure it’s shaping correctly and fits you comfortably.
Creating the Desired Length
The length of your poncho is a crucial aspect of its design. The desired length can vary from a short, cape-like poncho to a longer, flowing piece. To achieve the desired length:
1. Reference the Pattern: The pattern will specify the desired length for your poncho. Follow these instructions closely.
2. Measure as You Go: Regularly measure your poncho’s length to ensure it matches the pattern’s requirements. Use a measuring tape or simply hold your work up to your body to gauge the fit.
3. Customize: If you prefer a longer or shorter poncho than the pattern suggests, adjust the length accordingly. Be mindful of stitch count and pattern repeats to maintain consistency.
Keep in mind that the length of your poncho can dramatically change its look and function. A shorter poncho is great for layering over outfits, while a longer one may provide more warmth and coverage. It’s all about creating the piece that suits your style and needs.
By mastering basic crochet stitches, understanding increases and decreases, shaping your poncho to fit, and achieving the desired length, you’ll be well on your way to crafting a crochet poncho that’s not only a stylish addition to your wardrobe but also a testament to your creative crochet skills. These techniques are the building blocks that allow you to take a pattern and customize it to make a poncho that’s uniquely yours.
Adding Details & Crochet a poncho for beginners
Once you’ve mastered the foundational steps of crocheting your poncho, it’s time to add those special touches and design elements that will make your creation unique and truly your own. These optional embellishments can take your crochet poncho from ordinary to extraordinary:
1. **Fringe:** Adding fringe to the edges of your poncho can create a playful, bohemian look. To attach fringe, cut strands of yarn to your desired length, fold them in half, and loop them through the edge stitches, securing them with a simple knot. Trim the fringe to an even length for a polished finish.
2. **Buttons:** Sewing buttons onto your poncho can not only serve a practical purpose by allowing you to fasten it but also add a decorative element. Choose buttons that match your style and the color of your yarn for a coordinated look.
3. **Tassels:** Tassels are another charming addition. You can create tassels by wrapping yarn around a piece of cardboard, tying it at the top, and cutting the loops at the bottom. Attach tassels to the corners or along the edges of your poncho for a fun, whimsical touch.
4. **Colorwork:** Incorporating colorwork techniques, such as stripes, color blocks, or intricate patterns, can make your poncho stand out. You can use different colors of yarn to create bold contrasts or subtle gradients, depending on your design preferences.
5. **Stitch Variations:** Experiment with different crochet stitches to create unique textures and patterns. For example, you can add clusters, bobbles, or shells to your poncho to give it a distinctive look and feel.
The choice of embellishments and design elements is a personal one. Consider your style and the overall aesthetic you want to achieve. Don’t be afraid to get creative and let your imagination run wild.
Creating a Border for the Poncho
Adding a border to your crochet poncho not only provides a polished finish but also enhances the structure and durability of the piece. Borders can vary in complexity from simple and clean to intricate and decorative. Here’s how to create a border for your poncho:
1. Choose a Border Stitch: Decide on the type of stitch you want for your border. Common choices include single crochet, half-double crochet, or double crochet. The choice of stitch can influence the width and texture of your border.
2. Start at a Corner: Begin your border at a corner of your poncho. Insert your crochet hook into a stitch or space, yarn over, and pull up a loop to create your first border stitch.
3. Work Evenly: Continue working your chosen border stitch evenly around the entire edge of your poncho. This often means making one stitch per row or space along the edge.
4. Join at the Beginning: When you’ve worked all the way around, join your last border stitch to the first one using a slip stitch. This creates a seamless and continuous border.
5. Customize: You can customize your border by changing colors, adding picots (small loops), or experimenting with different stitches. This is where your creativity can shine.
A well-executed border not only adds a professional touch to your poncho but also helps prevent edges from curling and provides a stable finish. It can be a subtle frame or a decorative feature, depending on your preference.
The process of embellishing your poncho and adding a border is where your creativity can shine. Experiment with different elements and techniques to make your crochet poncho truly one-of-a-kind. Whether you prefer a simple, classic look or want to make a bold fashion statement, these details and finishing touches will help you achieve your desired style.
Finishing Touches
After completing the crocheting of your poncho, it’s important to know how to fasten off the yarn securely. Fastening off ensures that your hard work doesn’t unravel, and it gives your project a neat and professional finish. Here’s how to fasten off your yarn:
1. Cut the Yarn: Leave a tail of yarn that’s at least 6 inches (15 cm) long to work with. This tail will be used to weave in the end.
2. Yarn Over and Pull Through: Finish the last stitch as you normally would, but instead of creating another loop, pull the working yarn through the stitch until you have a small loop remaining on your hook.
3. Secure the Loop: Gently pull on the loop to tighten it, ensuring it’s snug but not too tight. This secures the last stitch in place.
4. Cut the Yarn: Use your scissors to cut the working yarn, leaving a tail of about 1 inch (2.5 cm).
Your yarn is now fastened off, and the final stitch is secure. This process ensures your poncho won’t unravel, and it prepares you for the next steps.
Weaving in Loose Ends
Weaving in loose ends is an essential step in finishing your crochet project. It involves hiding the tails of yarn that are left after fastening off and changing colors. Here’s how to weave in loose ends:
1. Thread a Yarn Needle: Take one of the yarn tails and thread it onto a yarn needle. Yarn needles have a large eye that can accommodate yarn and make the weaving-in process easier.
2. Weave Through Stitches: Insert the yarn needle under the stitches on the wrong side of your work. Weave the yarn in a zigzag or diagonal pattern for a few inches to ensure it’s secure.
3. Trim the Excess: After weaving in the yarn for a sufficient length, snip off the excess yarn close to your work. Be careful not to cut your project.
4. Repeat for Other Ends: Repeat the process for all the loose ends, both those from fastening off and any color changes in your project.
Weaving in ends keeps your poncho looking tidy and ensures that your work stays intact even with regular wear and washing.
Blocking and Shaping the Poncho
Blocking and shaping your poncho is the final step to enhance the overall appearance and drape of your project. This process helps to set the stitches and give your poncho a more professional finish. Here’s how to block and shape your crochet poncho:
1. Gather Supplies: You’ll need a blocking mat or surface, rust-resistant T-pins or blocking wires, and a spray bottle with water.
2. Wet Blocking: For natural fibers like cotton or wool, dampen your poncho by spraying it with water. Avoid soaking it; a light mist is sufficient.
3. Pin It: Lay your poncho flat on the blocking surface. Gently stretch and shape it to the desired dimensions, making sure it’s symmetrical. Use T-pins or blocking wires to secure the edges and corners in place.
4. Let It Dry: Allow your poncho to dry completely in this blocked position. This can take a day or two, depending on the yarn and weather conditions.
5. Steam Blocking (Optional): For synthetic or delicate fibers, you can use a steamer to lightly steam the poncho while it’s on the blocking surface. Be cautious not to touch the iron to the yarn but rather let the steam hover over it.
6. Remove Pins: Once your poncho is dry, carefully remove the pins or wires. Your poncho should retain its shape and dimensions.
Blocking helps even out the tension of your stitches and ensures that your poncho drapes beautifully. It’s especially important if you’re making lace or openwork ponchos, as it allows the design to shine and the fabric to relax into its final shape.
The finishing touches of fastening off, weaving in loose ends, and blocking and shaping your poncho are essential for giving your project a professional and polished appearance. These steps not only enhance the aesthetics of your creation but also ensure its longevity and durability, making it a piece you can proudly wear and showcase your crochet skills.
Tips and Troubleshooting
Crocheting a poncho can be a rewarding experience, but it’s not without its challenges. Here are some common mistakes you might encounter and how to address them:
1. Tight or Loose Stitches: Inconsistent tension can result in stitches that are too tight or too loose. To fix this, practice maintaining a consistent tension and consider using a larger or smaller crochet hook to achieve the desired stitch size.
2. Miscounts: Accidentally adding or skipping stitches can lead to irregular patterns or uneven edges. Always double-check your stitch count at the end of each row or round, and use stitch markers to help keep track.
3. Twisting the Foundation Row: If your poncho pattern starts with a foundation chain that you join to form a circle, be cautious of twisting it. Ensure that the chain lies flat before making your first round of stitches.
4. Color Changes: Changing colors can create a stunning effect, but it’s essential to manage your yarn tails neatly. Weave in the ends as you go to avoid a tangled mess.
5. Mistakes in Pattern Reading: Misinterpreting crochet patterns can lead to errors. Always carefully read and understand the pattern before starting, and don’t hesitate to seek help or clarification if something is unclear.
6. Yarn Splitting: Some yarns may split, making it challenging to work with. Try using a smoother, well-defined hook, or switch to a different type of yarn that is less prone to splitting.
Tips for Maintaining Consistent Tension
Tension is crucial in crochet, as it influences the size and appearance of your stitches. Here are some tips to help you maintain consistent tension:
1. Practice: Consistent tension comes with practice. Spend time working on swatches or small projects to develop your tension control.
2. Relax Your Hands: Tension issues can arise when your hands are too tight. Keep a relaxed grip on your crochet hook and yarn to prevent unnecessary tension.
3. Use the Right Hook: Ensure you’re using the recommended crochet hook size for your chosen yarn. A hook that’s too small or too large can affect your tension.
4. Mindful Stitching: Pay attention to your stitching speed. Avoid rushing, as it can lead to inconsistent tension. Slow and steady often produces better results.
5. Check Your Gauge: Make a gauge swatch at the beginning of your project to verify that your tension matches the pattern’s requirements.
Handling Different Yarn Types
Crocheting a poncho can involve a wide variety of yarn types, each with its unique characteristics. Here’s how to handle different yarn types effectively:
1. Cotton Yarn: Cotton yarn is breathable and great for warm-weather ponchos. Keep in mind that cotton has less elasticity, so your stitches may appear firmer. Use a larger hook to maintain drape.
2. Wool Yarn: Wool provides warmth and is perfect for cozy ponchos. Be cautious when washing wool; some varieties may shrink or feel. Always follow care instructions.
3. Synthetic Yarn: Acrylic and other synthetic yarns are durable, easy to care for, and budget-friendly. They can be a great choice for beginners. However, they can be less breathable, so consider this for warm-weather projects.
4. Bouclé Yarn: Bouclé yarn has loops or bumps along its strand, which can make it challenging to work with. Pay close attention to your stitches, as they may be harder to see. Use a simple pattern to showcase the yarn’s texture.
5. Novelty Yarn: Novelty yarns come in various textures, including eyelash, ribbon, and metallic. Choose a simple pattern to allow the yarn’s unique texture to shine, and be prepared for some visibility challenges in your stitches.
6. Variegated Yarn: Variegated yarns have color changes built-in. Be mindful of how the color transitions affect your pattern, especially if it’s intricate. You may need to adjust your stitch count accordingly.
7. Blending Yarns: Mixing different yarn types and textures can create exciting effects. Experiment and swatch first to ensure you like the combination and that your tension remains consistent.
Understanding the characteristics of different yarn types is essential for selecting the right material for your project and adapting your technique to achieve the best results. Crocheting with diverse yarns can lead to stunning and unique ponchos that reflect your individual style.
Final Thoughts
Crocheting a poncho, especially as a beginner, can be a fulfilling and creative journey. Here’s a recap of the key steps to guide you through the process:
– **Materials:** Gather the necessary materials, including yarn, a crochet hook, scissors, a yarn needle, measuring tape, and stitch markers.
Choosing a Pattern: Select a simple poncho pattern suitable for beginners and learn how to read and understand crochet patterns.
Getting Started: Make a slipknot, chain the foundation row, and join it into a circle to start your project.
Crocheting the Poncho: Learn and master basic crochet stitches, such as single crochet and double crochet, and understand how to increase, decrease, shape, and create the desired length.
Adding Details: Add optional embellishments and design elements to personalize your poncho. Consider creating a border to give it a polished finish.
Finishing Touches: Finish your poncho by fastening off the yarn, weaving in loose ends, and blocking and shaping it to perfection.
Encourage Beginners to Experiment and Personalize Their Ponchos
Crocheting a poncho is not just about following a pattern; it’s an opportunity to let your creativity shine. As a beginner, don’t be afraid to experiment and personalize your poncho in various ways. Here are some ideas:
- Color: Play with color combinations to create a poncho that reflects your personal style. Choose a color palette that matches your wardrobe and showcases your uniqueness.
- Stitch Patterns: While starting with basic stitches is recommended, once you’re more confident, try incorporating different stitch patterns to add texture and visual interest to your poncho.
- Embellishments: Consider adding unique embellishments like buttons, fringe, or tassels. These details can give your poncho a one-of-a-kind look.
- Yarn Selection: Explore the world of yarn. Try different types, textures, and blends to see how they affect the final appearance and feel of your poncho.
- Shape and Length: Modify the shape and length to suit your preferences. A short, lacy poncho or a long, cozy one – it’s all about making it your own.
The beauty of crocheting is that it allows you to express your individuality. Don’t be discouraged by mistakes or deviations from the pattern; often, it’s these unique touches that make your project truly special.
Once you’ve successfully crocheted your poncho, it’s time to enjoy the fruits of your labor. Here’s some inspiration on how to use and style your new creation:
- Everyday Wear: A crochet poncho is versatile and can be worn as an everyday piece. Pair it with jeans, leggings, or a skirt for a comfortable and stylish look.
- Layering: Ponchos are fantastic for layering. In cooler weather, wear it over a long-sleeved shirt or sweater. You can also add a belt to cinch it at the waist for a more tailored appearance.
- Accessories: Play with accessories like a wide-brimmed hat, a statement belt, or a chunky necklace to elevate your outfit.
- Festival Fashion: Crochet ponchos are a favorite at music festivals and outdoor events. They add a bohemian flair and keep you warm in the evenings.
- Beach Cover-Up: Use your poncho as a stylish cover-up for the beach or pool. It provides protection from the sun and a relaxed, beachy vibe.
- Gift Giving: Share your crochet skills with friends and family by gifting them a custom-made poncho. It’s a thoughtful and personalized present that’s sure to be cherished.
- Inspire Others: Share your poncho creation on social media or in your crochet community to inspire and encourage fellow crafters to embark on their creative journey.
A crocheted poncho is not just a garment; it’s a testament to your craftsmanship and creativity. It’s a warm hug on a chilly day and a statement piece that adds character to any outfit. Your journey from selecting materials and following patterns to personalizing your creation is an empowering and artistic endeavor.
As you wear your handmade poncho, know that it’s a reflection of your skill, dedication, and personal style – a work of art that you can be proud of. So, grab your crochet hook, choose your favorite yarn, and start crocheting your very own poncho today.
Conclusion
In this comprehensive guide, we’ve explored the enchanting world of crochet, with a particular focus on creating beautiful ponchos for beginners. Let’s recap the main points:
Introduction: We introduced the concept of a poncho, highlighting its versatility as a clothing item, and explained the purpose of this article: teaching beginners how to crochet a poncho. We also listed the materials needed for the project.
Materials Needed: We delved into the importance of yarn selection and quantity, choosing the right crochet hook size, and other essential tools and accessories for a successful project.
Choosing the Right Pattern: We guided beginners on how to explore simple poncho patterns suitable for their skill level and explained the basics of reading and understanding crochet patterns.
– **Getting Started:** We outlined the initial steps, from making a slipknot to chaining the foundation row and joining it into a circle.
– **Crocheting the Poncho:** We provided an in-depth understanding of basic crochet stitches like single crochet and double crochet, along with instructions on increasing, decreasing, shaping, and achieving the desired length.
Adding Details: We encouraged creativity by discussing optional embellishments and design elements and demonstrated how to create a border for a polished finish.
Finishing Touches: We shared the importance of fastening off the yarn, weaving in loose ends, and blocking and shaping the poncho for a professional result.
Tips and Troubleshooting: We addressed common mistakes, offered tips for maintaining consistent tension, and provided guidance on handling different yarn types.
Final Thoughts: We encouraged beginners to experiment and personalize their ponchos, emphasizing the uniqueness of each creation.
Encourage Beginners to Start Their Crochet Poncho Project
Now that you have all the tools, knowledge, and inspiration needed to embark on your crochet poncho journey, it’s time to take that first step. Crocheting a poncho is not just about crafting a piece of clothing; it’s about self-expression and creativity. Here’s why you should start your crochet poncho project:
1. Empowerment: Crochet is a skill that empowers you to create beautiful, functional pieces of clothing with your own hands. Starting a poncho project is a wonderful way to harness that creative power.
2. Unleash Creativity: Crochet is an art form, and with each stitch, you’re creating a work of art. Experiment with colors, textures, and designs to make your poncho uniquely yours.
3. Practical and Stylish: Ponchos are not only fashionable but also practical. They can be worn in various settings, from casual to formal, and provide warmth and comfort.
4. Mental Well-being: Crocheting is known to have therapeutic benefits. It’s a mindful and meditative craft that can help reduce stress and promote relaxation.
5. Community and Sharing: Crochet has a vibrant and supportive community of crafters. By starting your crochet journey, you’re connecting with a network of like-minded individuals who share their knowledge, passion, and encouragement.
6. Endless Possibilities: The world of crochet is vast and full of possibilities. Once you’ve mastered the basics, you can explore more intricate patterns, techniques, and projects.
So, whether you’re a complete beginner or have some crochet experience, take the leap and start your crochet poncho project. You’ll be amazed at the beautiful creation you can fashion with your own hands.
The process of selecting materials, following patterns, experimenting with colors, and adding personal touches is an immensely rewarding and fulfilling experience. Crocheting a poncho is not just a project; it’s a journey of self-discovery, creativity, and skill-building.
Get your crochet hook ready, choose your favorite yarn, and begin crafting your very own crochet poncho today. Happy crocheting!