Unlock the joy of rainy days by learning “how to make children rain poncho” with our comprehensive guide.

Rainy days can be a source of joy for children, provided they have the right gear to keep them dry and happy.
One essential piece of rain gear is the rain poncho, and what better way to make it special than by crafting it yourself?
This comprehensive guide will take you through the step-by-step process of creating unique and functional children’s rain ponchos that will keep them dry and add a touch of creativity to their rainy-day adventures.
Jump to a Specific Section
- Materials Needed:
- Waterproof Fabric:
- Fabric for Lining (Optional):
- Scissors:
- Measuring Tape:
- Sewing Machine or Needle and Thread:
- Velcro or Snaps:
- Pencil or Fabric Marker:
- Pins:
- Step 1: Take Measurements
- Step 2: Cut the Fabric
- Step 3: Create a Hood (Optional)
- Step 4: Sew the Seams
- Step 5: Neck Opening
- Step 6: Hem the Poncho
- Step 7: Personalize with Designs
- Step 8: Test for Waterproofing
- Step 9: Enjoy the Rainy Day Adventures
- FAQ’s
- Steps:
Materials Needed:
Before diving into the crafting process, gather the necessary materials. The beauty of making your children’s rain ponchos is the flexibility to choose colors, patterns, and materials that resonate with your child’s preferences. Here’s a basic list to get you started:
Waterproof Fabric:
Select a waterproof material such as nylon, polyester, or vinyl. These materials will provide the necessary protection against rain while being lightweight and easy to work with.
Fabric for Lining (Optional):
If you want to add a soft lining for extra comfort, choose a porous, light fabric, such as fleece or cotton.
Scissors:
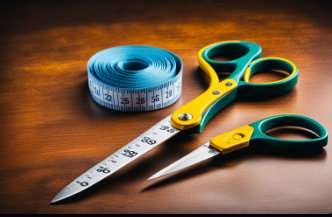
Cutting with quality fabric scissors will be easier. Through the material, a breeze
Measuring Tape:
It is essential for ensuring accurate measurements and a well-fitted poncho.
Sewing Machine or Needle and Thread:
You can use a sewing machine or hand-sew the poncho depending on your preference and sewing skills.
Velcro or Snaps:
Choose fasteners that are easy for children to manage, ensuring a secure closure for the poncho.
Pencil or Fabric Marker:
For marking measurements and cutting lines on the fabric.
Pins:
It is useful for holding fabric layers together while sewing.
Now, let’s move on to the step-by-step process of crafting a delightful children’s rain poncho.
Step 1: Take Measurements
Before cutting the fabric, measure the child wearing the poncho. Consider the length from the neck to the desired hemline and the width from one wrist to another. These measurements will be the basis for cutting the fabric, ensuring a comfortable fit.

Step 2: Cut the Fabric
Using the measurements, cut the waterproof fabric to the desired size. Remember that a poncho is typically a loose-fitting garment, so there’s no need for complex shaping. If you’ve chosen a lining fabric, cut it to the same dimensions as the waterproof fabric.
Step 3: Create a Hood (Optional)
To add a hood to the poncho, cut a fabric in a hood shape. Sew the curved edges together, and then attach the hood to the neckline of the poncho. This step is optional, but a hood can provide additional protection on rainy days.
Step 4: Sew the Seams
Sew with the fabric’s right sides facing each other. The side seams of the poncho. If you’ve chosen to include a lining, sew the lining fabric separately and then attach it to the waterproof fabric. Leave an opening for the neck.
Step 5: Neck Opening
Finish the neck opening by adding Velcro, snaps, or another fastening method. This will ensure the child can easily put on and remove the poncho.

Step 6: Hem the Poncho
Fold and hem the edges of the poncho to create a clean and finished look. This step is essential for preventing fraying and enhancing the durability of the poncho.
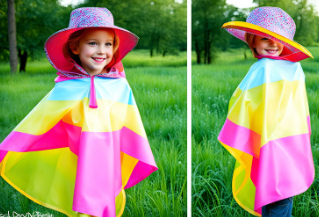
Step 7: Personalize with Designs
Make the rain poncho uniquely your child’s by adding fun designs or embellishments. Consider using fabric paints, appliqués, or iron-on patches to create a personalized and visually appealing garment.
Step 8: Test for Waterproofing
Before the first use, conduct a simple waterproofing test. Sprinkle water on the poncho and observe if it beads and rolls off the fabric. Apply a waterproofing spray to enhance the poncho’s water resistance if necessary.
Step 9: Enjoy the Rainy Day Adventures
Once your handmade children’s rain poncho is complete, it’s time for your child to enjoy rainy day adventures with their personalized and functional rain gear.
Whether jumping in puddles, exploring nature, or staying dry on the way to school, the custom-made poncho will add a special touch to every rainy day experience.
how to make children rain poncho
FAQ’s
How do you make a waterproof poncho?
Making a waterproof poncho involves selecting the right materials and following key steps. Here’s a basic guide:
Materials:
Waterproof Fabric:
Choose materials like nylon, polyester, or vinyl for their water-resistant properties.
Lining Fabric (Optional):
Select a lightweight and breathable fabric like cotton or fleece for added comfort if desired.
Fasteners:
Use Velcro, snaps, or another suitable option for securing the poncho.
Steps:
Measurements:
Measure the wearer’s length from neck to hem and width from wrist to wrist for accurate sizing.
Cutting:
Cut the waterproof fabric to the measured dimensions. If using lining fabric, cut it to the same size.
Hood (Optional):
Cut and sew a hood shape to add this feature.
Seams:
Sew the side seams with the right sides of the fabric facing each other. If using lining, sew it separately and then attach it to the waterproof fabric, leaving an opening for the neck.
Neck Opening:
Add Velcro, snaps, or other fasteners to create a secure yet easily adjustable neck opening.
Hemming:
Fold and hem the edges to prevent fraying and provide a finished look.
Personalization:
Add designs or embellishments using fabric paints, appliqués, or iron-on patches to personalize the poncho.
Waterproofing Test:
Before use, conduct a waterproofing test by sprinkling water on the poncho to ensure it beads up and rolls off the fabric. Apply a waterproofing spray if needed.
Enjoy the Poncho:
Once complete, the waterproof poncho is ready for use during rainy days, providing both functionality and a personalized touch.
Can kids wear ponchos?
Kids can wear ponchos, which are often excellent rain gear for children. Ponchos designed specifically for kids are available in various sizes, colors, and designs, catering to different age groups and preferences.
Kid-friendly ponchos are designed with vibrant colors, playful patterns, and easy-to-use fasteners, making them practical and appealing for children.
Children’s ponchos are functional in keeping kids dry during rainy weather and offer the advantage of being easy to put on and take off.
The loose-fitting design provides comfort and allows for movement, making them suitable for various outdoor activities.
Additionally, the lightweight nature of ponchos makes them convenient for kids to carry and pack, making them a practical choice for school, outdoor adventures, or family outings in unpredictable weather.
When making or purchasing a poncho for a child, it’s important to consider the child’s measurements for a proper fit and choose materials that are easy to clean, long-lasting, and waterproof.
With the right poncho, kids can embrace rainy days with style and enthusiasm, turning potentially dreary weather into a fun and memorable experience.
Conclusion:
Crafting a children’s rain poncho is a practical and delightful way to infuse creativity into rainy day routines.
By following these step-by-step instructions and selecting materials that reflect your child’s personality, you can create a unique and functional rain poncho that will bring smiles to their face, even on the gloomiest days.
Embrace the joy of crafting, and let your imagination run wild as you make rainy-day memories that will last a lifetime.